Sunday, September 29, 2013

Baby's Finished (Budget) Nursery

My husband and I have been working on the finishing touches for the nursery.

Here is the big "reveal" and a little advice on putting together a nursery without spending a bundle!

We have a really small house, so Baby's room is a little compact.

One side of the room is all of the changing supplies.


 Along with the growth chart made by my sister. 


She did such a great job with it! I love that hedgehog on top! 


The changing table was a fun little project to do. It was my dresser when I was a little girl. I will tell you how to repaint laminate furniture soon!

The tiger postcard and elephant painting were found by my mom, and the vintage grocery wire rack was found at a garage sale for $8. Perfect for a little nursery shelf!


In the two top dresser drawers are cloth diapers. The covers and burp clothes on one side,


And the diaper inserts and doublers on the other side! 


The other side of the room is storage, the rocker, and the crib. 


The wall hanging was made by my husband's mother and the quilt on the crib was made by my mom.

It was so fun that ALL of our family members really helped out in making and finding stuff for our baby! What a blessing to have such wonderful people in our lives!!


I love this rocker! My mom found it for $5 at a garage sale and remade the cushions out of a queen-sized Herringbone patterned blanket. She did such a fantastic job!! I can't wait to rock my baby boy in it :)


The last part of the nursery is the bookcase. Which is one of the only things we have for storage. 

* FUN FACT: Our little rental home only has one closet in the whole house. That's right, ONE. So we have to get a little creative with storage sometimes :)


Our bookcase contains 6 of these covered baskets from Target. They are perfect for keeping small things like hats and socks contained and organized! I also added little tags with baker's twine so I know what is where!!

Now the only thing left to do is wait for baby to come!! :)

Budget Breakdown:

- Changing table: Table = Free (Already had it)
             Spray Paint = $24
             Knobs = $35

- Wire Rack = $8 (Found at a Garage Sale)

- Crib = $4 (My mom found this gem at a Garage Sale!)

- Rocker = $5 for the rocker + $60 for the Target blanket

- Bookcase = FREE (My sister was getting rid of it!)

- Wall Art = FREE (for family gifts) + $35 for a matted 5x7 frame for the Tiger and 3 4x6 frames
              + $9 for post cards

- Other accessories were mostly gifts from the baby shower!

Sunday, September 8, 2013

My Freezer Meal Weekend!

I have 4 weeks of pregnancy left. Let me tell you, I am definitely able to do less and less at a time before I get worn out!

One thing I CAN still do though, is cook and bake! Which is fantastic, because it is one of my FAVORITE things to do! :)


Because I know I am not going to want to cook anything for a couple of weeks after giving birth, I decided to stock up my freezer with lots of goodies to keep our little family fed and energized while we're getting used to our new life together.

Currently in my freezer:

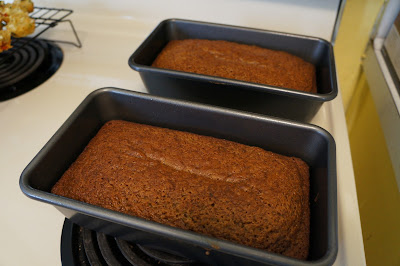
2 Loafs Banana Bread
4 Dozen Chocolate Chip Cookies (Frozen in cookie-sized dough form)
1 Pan of Pizza Hotdish
2 Dozen Pancakes
1 Dozen Twice-Baked Potatoes
2 Pizza Doughs

Adding today:

2 Loafs Zucchini Bread
3 Dozen Quinoa Pizza Bites

Still on my list to add:

More Pizza Dough
Tortilla Soup
Chili
Turkey Pot Pie
Biscuits
Cinnamon Rolls
Anything else I am feeling up to making :)


Most of this I have done within the last 3 days.

Here's How:

Friday:
I baked 6 large red potatoes while I was cooking/baking my 2 batches of Pizza Hot Dish (One to eat that night, one to freeze) The potatoes went to cool in the fridge that night and 1 of the casseroles went to the freezer.

{*TIP* When your oven is on, USE IT! This may seem simple, but one of the best tips I have for you is to bake two or three things at a time when your oven is on. Just make sure everything bakes at the same temperature and keep a close eye on it!}

The whole process took an hour and a half because the noodles and meat for the hot dish needed to be cooked first.

Saturday:
I cut baked potatoes in half, scooped out the centered and blended that with a little almond milk, garlic powder and cheese. Scoop this mixture back into the potatoes and press a little extra shredded cheese on top. (You can mix other spices, omit the cheese, add butter, etc. to this recipe, this is just how I made them)

Flash freeze these on a cookie sheet. Meanwhile, mix up your favorite cookie dough!

Remove the potatoes, place them in a freezer bag, and write directions on how to cook them (Bake at 350 for 30-40 min. Defrost first!). Use the cookie sheet to place individual cookie dough balls in the freezer. These you will also place in a freezer bag once they are initially frozen!

I then cooked 1 cup of quinoa (made 3 cooked cups!) while I made 2 batches of my favorite pizza dough to freeze. That way I felt like I was using my time wisely in the kitchen!

{*TIP* Just like the oven, when you are in your KITCHEN, use your time to your advantage! Cook rice, pasta, quinoa, or meat to use at a later day that week! You'll be able to keep a good eye on it and save time another day!}

When the cookies are frozen, place them in the freezer bag with directions on how to bake (Add 1 or 2 minutes and check them often when baking! My recipe needs 4 extra minutes!). Use the cookie sheet to freeze the pizza dough in a ball that will fit your freezer bags (I used quart sized for each of my dough balls).

Place your quinoa in the fridge for another day!

Not sure how long this process took me as I took a few breaks this day :) But I would guess no more than 2 hours, not counting freezing time.

Sunday:
I started with my quinoa at about 10:30 this morning. I made a batch and a half of Quinoa Pizza Bites for our freezer. When these were in the oven, I used the time to wash the dishes and mix up my zucchini bread recipe. These went in the oven right after the quinoa bites and now I am ready to add all of them to the freezer! 3 hours only!


So in only took 7 hours split up over a couple of days. Not bad! Totally doable for those who are on a time crunch and cannot spend a whole day in their kitchen!


Thursday, August 15, 2013

Orange Pineapple Banana Smoothie

Oh my goodness. I just made the BEST smoothie ever!

Compare it to something that you would get at Orange Julius, only 10 times better because it doesn't have that weird powdered sugar taste to it AND it only contains 5 ingredients!

I do not have any pictures right now, but I just HAD to post the recipe anyways. IT'S THAT GOOD FOLKS!

Make it tomorrow,

or tonight!

All you need to blend is:

3/4 c. frozen or fresh pineapple
1 1/2 c. fresh spinach
2 oranges, peeled
1/2 c. water
2 bananas

Make sure it is blended well and, for fun, serve it with one of those pretty umbrellas :)


Tuesday, August 13, 2013

Baby's Nursery So Far!

The last few weeks my husband and I have been hard at work on the nursery. Here is our progress:


We still have a few things to buy, add, and hang on the walls, but it IS getting there!


I definitely used some of the ideas I posted previously, like the mixture of furniture, birdcage and woodland elements, and a large bookcase for added storage. 


I purchased the covered baskets from Target for additional organization. 


Next up is curtains, rocking chair (currently being recovered by my Mom!), and finishing off the changing table/dresser!

Sunday, July 7, 2013

Nursery Inspiration

Now that my husband and I are back from vacation, it is time to start thinking more about the little bundle of joy we will be receiving in October. :)

These are some of the rooms and items that have been inspiring me lately:

Overall Feel:


This was my very first inspiration for a nursery. It is the epitome of a woodland-themed baby sanctuary. I just love that canvas! And the pillows are perfect.

http://www.thebooandtheboy.com/2011/08/gender-neutral-nurseries.html

Sunday, June 16, 2013

Travel Clothes for a Pregnant Lady

My husband and I are going on an 18 day road trip soon. Eighteen days! YAY!!! The rough part is we don't have much room for clothing and the temps are going to range from 60 - 85 degrees! That means I had to get creative...

I picked out a few tops that go with 1 pair of shorts, 1 pair of skinny jeans, and a maxi dress. They all use the same color scheme so it is easy to pair shoes and accessories. Let me show you how I mixed the tops and bottoms to make more than enough outfits for the trip!


I chose just 1 t-shirt that was long enough to cover my belly(!), 


that paired well with the shorts I'm bringing, 

Saturday, June 15, 2013

Road Trip to Cali & Washington State!

I am SO excited to tell you all that I will be updating my Travel page very shortly with the 4 NEW states (plus MAYBE Canada!) that I will be visiting in the next couple of weeks! YAY!


A rock ledge in Yellowstone National Park

This is a trip my husband and I have been planning for quite a while. It did not work out for us to venture across the nation last summer, so we were very determined to fit it in before the baby comes.

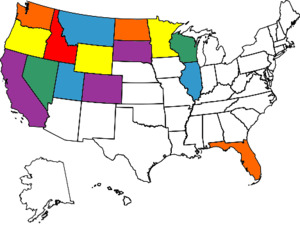
States Visited Map

This trip will increase my Visited States count to 15. It may not sound that impressive, but that is up from 11!

We don't plan on stopping in most of the popular cities, but have instead purchased a National Parks Pass that will allow us to bypass all of the entrance fees. We are hoping to get to 6 different parks on our trip: Glacier National Park in Montana, Yellowstone and Grand Teton parks in Wyoming, Mount Rainier National Park in Washington, and the Redwood and Yosemite national parks in California. If we have enough time, we may check out the North Cascades National Park in Washington and the Waterton Lakes National Park in Canada, which borders Glacier in Montana.


Mammoth Hot Springs area, Yellowstone National Park

If we DO get to visit all 8 parks, this would take our total number up to 9 American National Parks and 1 Canadian or International National Park. We have also visited Theodore Roosevelt National Park in North Dakota, and Badlands National Park in South Dakota.


Badlands National Park, South Dakota


I am so excited to share our travels and pictures when we get back!

Maybe I will do a post about each state! :)


Crazy Mountains by Big Timber, Montana


Until then, get out and do some traveling of your own!

Sunday, June 9, 2013

Fresh Smoothie Recipe!

I hope everyone's Sunday has been great so far! On this end, neither me nor my husband are feeling well. Unfortunately, we both have some type of head cold. Yuck.

We are working on getting rid of these with lots of rest and sleep, steam from the shower to break up the congestion and nasty stuff in our sinuses, and lots of fruit and veggies to get our body back on track! After all, the immune system doesn't work properly if it's not getting the right nutrients!

One of the best ways to get your fruit and veggies is a smoothie. Full of spinach and fruit, the smoothies we have been drinking are the quickest way to get our calcium, vitamin C, folic acid, and lots of other micronutrients! Even better? Baby seems to like them just as much as me! :)

So grab that blender and make one with me!


We have a Ninja, which we love because of the multiple blade action! There are 6 blades that are spaced halfway up the pitcher which means, no stirring!


Grab your veggies and fruit. I used spinach, cucumber, parsley (which I grabbed from my plant outside), bananas, an apple, strawberries, and blueberries. 

Saturday, June 8, 2013

Comfy Pregnancy Wear

When I first got pregnant, I definitely wanted to stay in my pre-pregnancy jeans and clothes as long as possible. I thought for sure with a little exercise it would be no big deal.

HA! Was I ever wrong!

I am currently at 23 weeks, only a little over halfway through and I do not want to wear my pre-pregnancy jeans for more than 4 hours at a time. Even though they still "fit" (with a BeBand -- the most important addition to my wardrobe!) when baby starts to move or when I am feeling especially tight in my belly, they just are not comfortable anymore.

There have definitely been some major changes to my wardrobe lately. These are some of the staples that I could not live without right now:

Be Maternity BeBand - Assorted Colors

The BeBand. Only $17, this has helped me stay in my pants for much longer than i would have otherwise!
BeBand -- Target


I love the V-Front yoga pants from Victoria's Secret. The V fits perfectly under my belly and is SO comfy, especially when baby is moving around!
V Front Yoga Pants


I don't like the feel of an elastic band right now (it feels too tight around the belly) so these are a great option for shorts!
Yoga Shorts

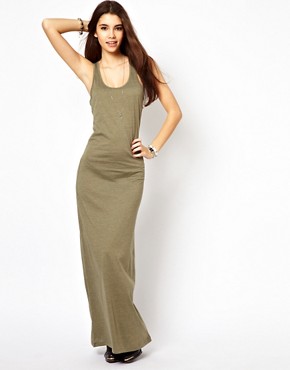
Image 1 of Only Maxi Tank Dress

These Asos maxis are only $15 and FANTASTIC! A large fits my growing body really well. I recommend one in EVERY COLOR.
Khaki Only Maxi Tank Dress


Long tees are a must-have and these Essential V-Neck Tees are long enough that your belly doesn't stick out at the bottom, no matter how BIG you get!
PINK V-Neck Tee


Tell me what your pregnancy wear must-haves are!

Monday, May 20, 2013

Perfect Rainy Day Food


What could be better than chocolate chip cookies and a yummy coffee with almond milk and honey? 

It's the only way to pass the time on a rainy day ;)

Friday, May 17, 2013

Suitcase Side Table

In December, I wrote a post about all of the fun vintage things I found at my grandpa's house.


After a small amount of time in storage, I have finished cleaning up the suitcases and made a great table out of them.


I left the taped F on the suitcase because it makes me think of my grandma toting them through an airport. Don't you just wonder what places these suitcases have seen? :) 


I topped the stack with a breakfast tray to make it a suitable flat top surface for decor and my coffee mug!


Pretty vases finished it off nicely!

To make your own check out garage sales, thrift stores and flea markets!

Bite-Sized Apple Pies

What screams summer more than apple pie?! That's right, Nothing! These are a perfect little summer treat as they are bite sized so you don't feel like you have to have a whole big piece. 


Yum.

Bonus: They are super easy.


These are the only two ingredients I used. Of course, you can substitute homemade pic crust and filling with just a tad more effort. 


Thursday, May 9, 2013

Simple Salad Recipe

I just made this salad for lunch. It is a super simple but absolutely delicious and satisfying one!


Doesn't it just LOOK amazing!?

It is romaine, spinach (feel free to substitute kale!), tomatoes, cucumbers, avocado, and sweet corn.

For a little extra flavor (not that it needs any) I squeezed a little lime over the top and sprinkled on some sea salt and pepper. It could definitely be made for a large crowd! AND since it doesn't get soggy, especially if you use the kale in place of spinach, it is perfect for a light lunch at work!

Enjoy your spring salads! :)

Monday, April 15, 2013

New Posts Soon!

Sorry I have been on a small hiatus lately! A couple months ago I found out that my husband and I are going to have our first child in October. YAY! Because of this I have mostly been focusing my attention elsewhere (Mainly to my growing belly!). I promise you all I will be baking and doing many new projects soon!

Hopefully it stops snowing soon so I can get some painting done!! :)

Wednesday, March 27, 2013

DIY Garden Projects

I can't wait to plant some things this Spring and get outside!  Does anyone like to eat outside as much as I do?  If it weren't for the bugs, I would do it every day it was nice enough too!

And this would be the perfect picnic table to use!


I couldn't find the link for this photo, but it seems pretty easy to do yourself. Just remove the middle wood slat find a gutter piece that is the correct size (hardware store!), cut the plank to accommodate the gutter, and reattach everything to your picnic table. Perfect for keeping those summer drinks cold.


Saturday, March 23, 2013

Setting Your Spring Table

Spring is all about bright colors, right?

So why not dress up your table with some colorful kitchen and dining finds! These will definitely brighten up your mood!


Floral Bella Mugs

These mugs have such a cute shape! Found at World Market the set of 4 is $23.96.


Saturday, March 16, 2013

Outdoor Garden Escapes

Spring is certainly on it's way! Although some days it may not feel like it...

As we are all looking forward to being outside again, I thought I would inspire you with some outdoor escape areas.


I hope to have one of these one day. *sigh*

Wednesday, March 6, 2013

Before and After: Kitchen Update

My husband and I rent a small, older house in Montana. Because it's older, some features are outdated and a bit dark for my liking! 

This winter I thought I would take on the a little update of our kitchen. 

We used to have brown paneling on one of the walls:


And tan cupboards with yellow behind the doors and on the ceiling.


Those are the before pictures. 

It was a bit of an odd color combination, so I needed to do something about it!

The first thing I did was paint the paneling and hang up some photos. 


That made me feel so much better about the kitchen!

It just brightened up the whole thing! Lovely. :)


I used the same shade of white to paint over the cupboard doors. (Sorry about the weird shadow... The sun was reflecting off of our vehicle.)


Those two changes (just with paint) made the kitchen feel infinitely better!! Less than $50 for the whole update. I kept the same hardware on the doors since it worked well. 


Next, I paint the ceiling!

Sunday, February 24, 2013

Banana Bars with Melt-in-your-Mouth Frosting

A couple days ago, I had a craving for banana bars. Every recipe I found was full of sugar so I did a little adapting and came up with a great recipe for dense banana bars.


Start by blending your softened butter with a cup of applesauce.


I used natural applesauce so it was about 100 calories per cup. 


Next, mix in your sugar, vanilla, sour cream, baking soda, and baking powder.


Don't worry if it bubbles a bit, that's just the baking soda mixing with the fruit.

After that, mix in the egg and mashed bananas. 2 large ones, or 3 medium ones should be about right. 


Lastly, mix in your 2 cups of flour and spread evenly into a jellyroll pan.


Bake for 25 minutes and 350 degrees. When they're still warm cover with the frosting. 


Enjoy your delicious banana bars :)


Banana Bars

1/4 c. softened butter
1 c. applesauce
1/3 c. sugar
1 tsp. vanilla
1 1/2 tsp. baking powder
1/2 tsp. baking soda
1/4 tsp. salt
1 egg
1 c. mashed banana
1/4 c. sour cream
2 c. flour

Preheat the oven to 350 and grease your 15x10 jellyroll pan. Blend softened butter and applesauce. Mix in the sugar, sour cream, vanilla, baking powder, soda, and salt, scraping down the sides. Next, blend the egg and bananas into the batter. Mix in the flour one cup at a time and pour the batter into the greased jellyroll pan. Bake for 25 minutes or until a toothpick comes out clean.


Melt-in-your-Mouth Frosting

1/4 c. butter
1 tsp. vanilla
3 tbsp. milk (almond milk works well too)
2 c. powdered sugar

Melt the butter in a medium saucepan. Bring it to a boil over medium heat and leave on the burner until it turns to a nice brown color and starts to smell really nice. There will be little flecks of brown in it and that is the stage you should remove it from the burner and start mixing in the other ingredients. Whisk in the vanilla and milk. Whisk the sugar in cup by cup. Immediately pour the frosting on the bars and spread out evenly.